
A matching friendship gift does not have to mean two identical bracelets. Shared colors, equal-sized stitched panels and a deliberate change of motif can make a pair feel connected while leaving room for each person's preferences. This guide supplies two original counted medallions, a split-color heart and a compass star, and shows how to plan them as a coordinated gift. You will find exact color counts, reversed-palette examples and a separate fitting record for each wearer. The symbol charts and free PDFs are at the bottom. For the full lined fabric-band construction, use the linked bracelet tutorial rather than treating these decorative panels as ready-made wrist measurements.
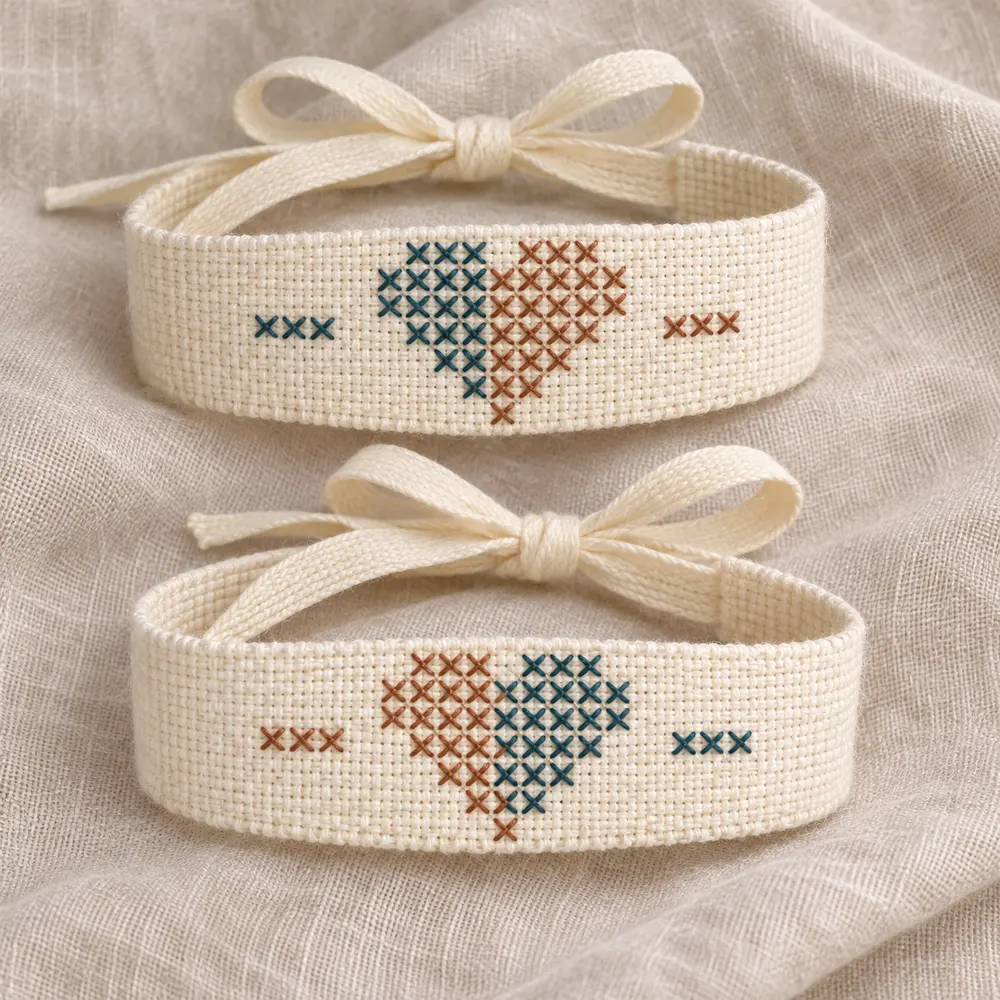
Decide what makes the pair belong together
Choose one shared feature before buying materials. It might be the same two thread colors, the same cream fabric, the same ribbon finish or the same central motif. Then decide what may differ. One person might prefer a heart while the other prefers a geometric star; alternatively, both can have hearts with their colors reversed. A clear pairing rule helps you avoid adding several unrelated details just because they are available.
These are embroidered fabric bracelets, not bracelets made entirely from knotted thread. The crosses sit on a small Aida panel that you attach to a comfortable band. Our fabric bracelet construction guide covers the lining and ribbon ties. This article concentrates on coordinating the two designs, checking their palettes and keeping the two recipients' measurements separate. Sketch both finished pieces beside each other before starting either one.
Choose the heart, the star or one of each
The Split Heart panel has 46 full crosses, including its two short horizontal side bars. The Compass Star panel has 51. Both use a 29 × 15-cell grid and the same pair of colors, so they occupy the same planned panel rectangle even though their silhouettes and stitch totals differ. This is useful when you want related gifts without forcing both people to wear the same symbol.
The heart has a seven-row central shape with a small gap between its upper lobes. The star extends across nine rows and has open gaps near its diagonal points. Neither needs backstitch, beads or fractional stitches. If one person prefers quieter decoration, choose the motif they find easier to read rather than assuming the lower stitch count automatically looks more subtle. Keep the empty margins and side bars in your paper layout; they contribute to the shared visual rhythm.
Test two real thread colors against the fabric
The supplied palette uses muted teal #476774 and copper #B87759. These are generic digital references, not guaranteed manufacturer thread numbers. Choose real floss by comparing it with the intended Aida and band fabric in daylight. Two colors can look distinct on a bright screen yet merge when stitched together on a warm cream background. Work a small block in each color and place them side by side before committing to both gifts.
Use two working strands on 14-count Aida as the starting setup. Keep the same strand count across the pair unless a sample gives you a reason to change it. Different coverage can make matching motifs look unexpectedly unrelated. Label the chosen threads by their chart roles, A and B, as well as their actual shade references. The beginner cross stitch guide explains strand handling if you are new to separating embroidery floss.
Keep panel dimensions separate from wrist size
At 14 crosses per inch, the full 29 × 15 grid measures approximately 5.26 × 2.72 cm. At 16-count it measures about 4.60 × 2.38 cm, and at 18-count about 4.09 × 2.12 cm. These dimensions include the blank edge cells. If you want two equal-sized panels, use the same effective fabric count for both. Printing one chart larger will not enlarge its stitched result; the fabric count controls that.
Draw a paper rectangle for each panel using the fabric size calculator if needed. Add finishing allowances outside that rectangle. With a 1 cm turn-under allowance around a 14-count panel, the final Aida cutting size is approximately 7.26 × 4.72 cm. Keep extra cloth while stitching if it helps you hold the work, then trim after checking. The bracelet band itself must still be fitted to each wearer rather than cut to the panel width.
Read the Split Heart chart accurately
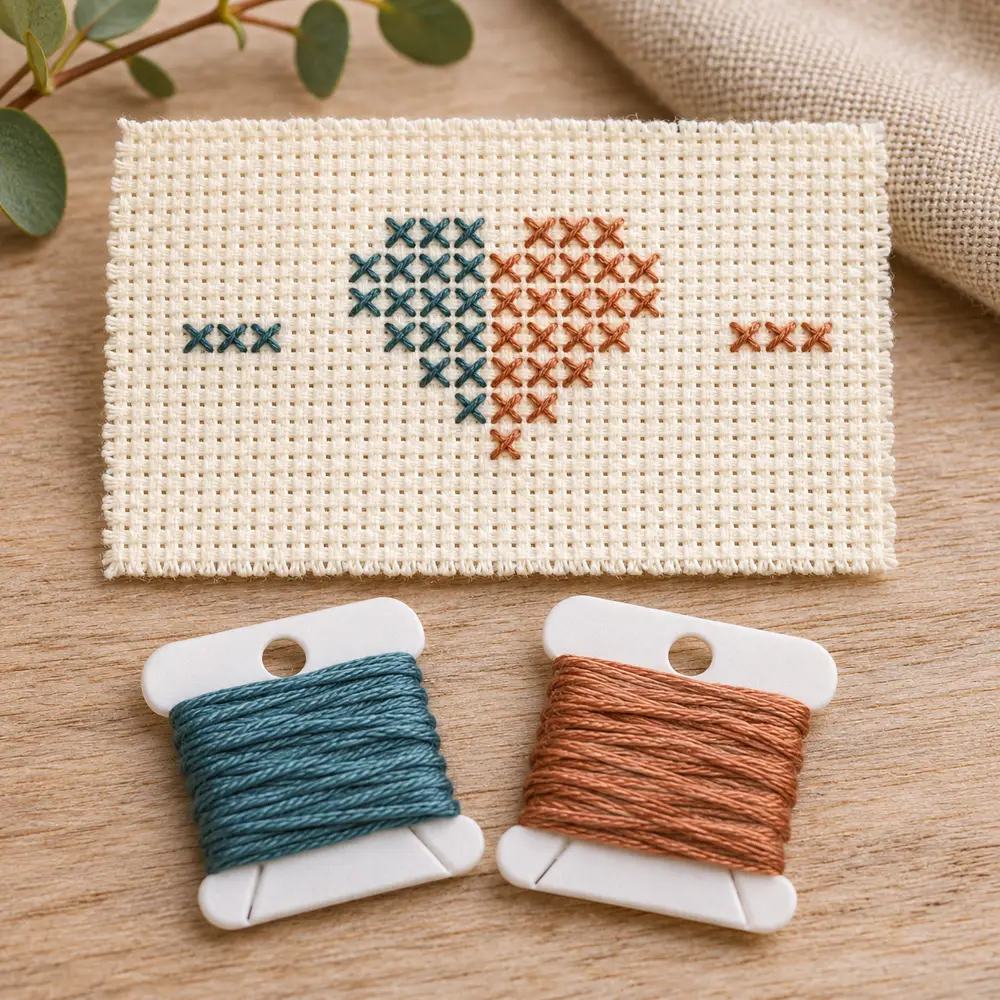
Read coordinates from the top-left corner, starting at column 1 and row 1. The central heart spans columns 11–19 and rows 5–11. Its row totals are 6, 9, 9, 7, 5, 3 and 1 crosses. The notch at column 15, row 5 stays empty; filling it would remove the gap between the lobes. The point at column 15, row 11 is a copper B stitch in the original palette.
The heart itself contains 40 crosses. Add three teal crosses in columns 5–7 on row 8 and three copper crosses in columns 23–25 on the same row. The complete panel then totals 46: 20 teal A crosses and 26 copper B crosses. The Split Heart pattern page provides the exact preview. Check the notch, the single bottom point and both three-cross bars before securing the final tail. A correct total alone cannot detect a stitch moved into the wrong cell.
Read the Compass Star chart accurately
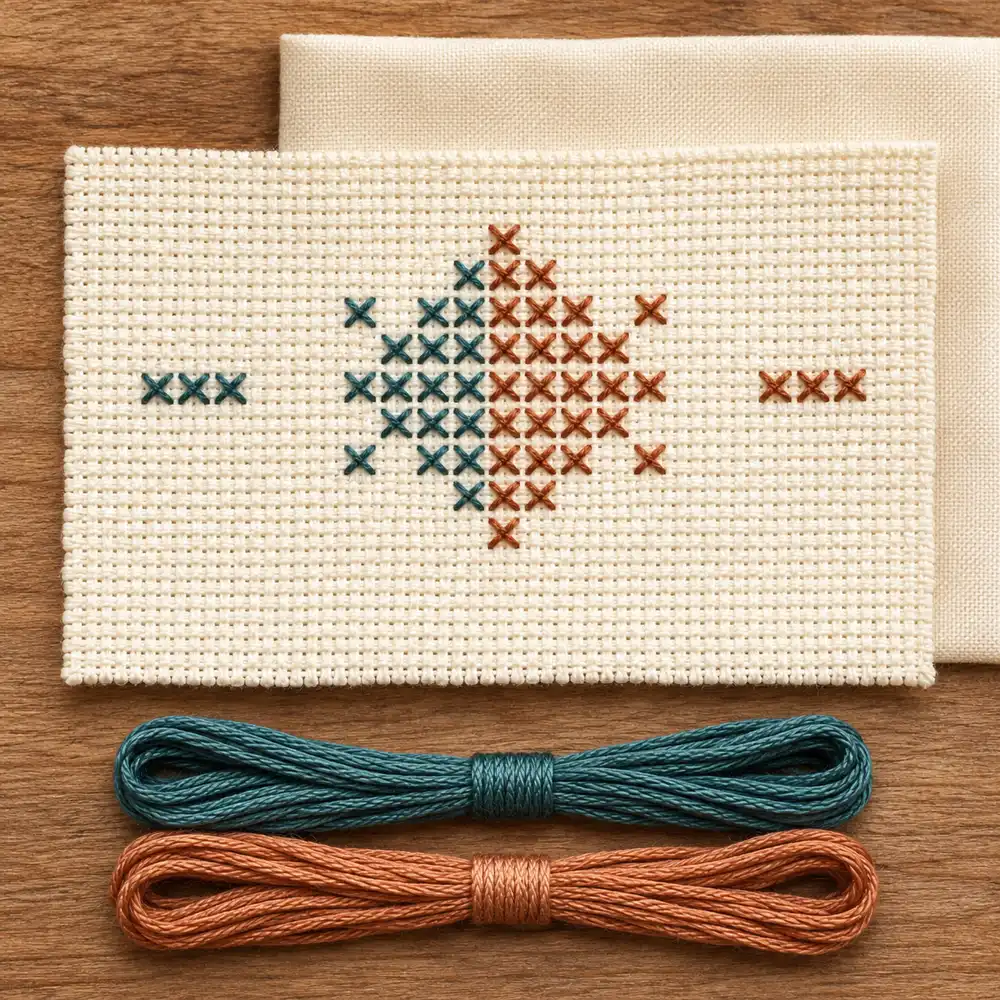
The central star spans columns 11–19 and rows 4–12. Its row totals are 1, 3, 7, 7, 9, 7, 7, 3 and 1, adding up to 45 crosses. On rows 6 and 10, the seven occupied cells are not one continuous block: each outer point is separated from the middle group by an empty cell. Those gaps preserve the stepped star outline, so count them rather than filling across the row by habit.
The same three-cross side bars appear in columns 5–7 and 23–25 on row 8. Including them gives 51 crosses: 21 teal A and 30 copper B. Use the Compass Star pattern page to check the exact cells. The center column belongs to B wherever it is occupied. Stitch the central row as a reference, then count outward carefully; do not turn the small side bars into long connectors between the bars and the star.
Reverse colors without accidentally mirroring the design
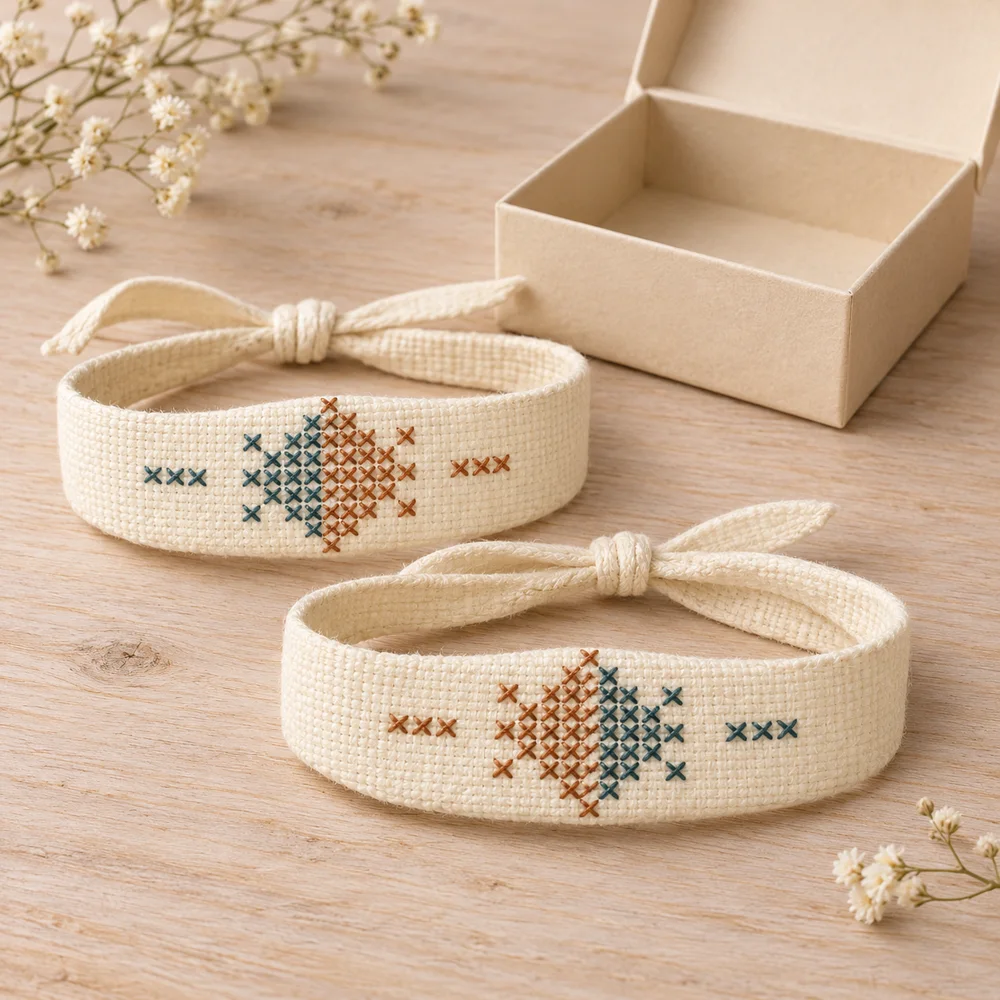
To reverse the palette, leave every cell and symbol unchanged and swap the physical threads assigned to A and B. On a reversed heart, A becomes copper for 20 crosses and B becomes teal for 26 crosses. The total remains 46. A reversed star uses 21 copper and 30 teal crosses. Write the changed key beside your working copy before you begin, rather than relying on memory once both threads are in use.
A color swap is not the same as a horizontal mirror. Mirroring moves cells across the grid, while a palette swap changes what thread fills them. Here, the central column stays in place during a mirror, making the distinction particularly important. If you experiment with another arrangement, record it in the blank-grid tool and verify the exported chart. For the simple reversed pair described here, no redrawing is needed: only the color key changes.
Make a combined thread-role record for the pair
One original heart uses 20 teal and 26 copper crosses. Combine it with a reversed star, which uses 30 teal and 21 copper, and the gift pair totals 50 teal plus 47 copper crosses: 97 altogether. Two hearts, one original and one reversed, need 46 crosses in each physical color, 92 overall. Two similarly opposed stars need 51 of each color, 102 overall. These totals are useful checks, not exact thread-length purchasing quantities.
Actual floss use also depends on strand count, fabric count, starting tails, carries and the way you finish each section. Keep enough of the same chosen shades for both pieces and a small repair reserve. Make a simple record with recipient, motif, A thread, B thread, fabric count and band size. Give each work-in-progress its own label. That prevents the second bracelet from silently reverting to the first palette when you resume after a break.
Fit each band independently
Equal panels do not require equal bracelet lengths. Measure both wrists separately and try paper bands before cutting the cotton backing. For example, with 1 cm ease and a 2 cm gap for ribbon ties, a 17 cm wrist leads to a 16 cm finished fabric band, while a 19 cm wrist leads to an 18 cm band. These are fitting examples to try, not universal sizes. Both can carry the same 5.26 cm-wide panel.
When centered, that panel leaves approximately 5.37 cm of plain band at each end of the 16 cm version and 6.37 cm on the 18 cm version. Keep the decorative center on the visible upper wrist area. Follow the lined bracelet assembly tutorial for seam allowances and tie placement. Write measurements on separate cutting notes; making the second band identical simply because the first fitted someone else defeats the purpose of a personal pair.
Work in an order that prevents mix-ups
Prepare both chart copies and mark their color keys first. You can stitch one entire panel before the other, or work one color on each in turn. Choose the sequence that lets you track the changed roles reliably. Do not carry a long thread across a blank region just to avoid restarting. The short side bars are separate groups, and a dark carry behind cream Aida can become visible or catch while the panel is handled.
Keep the upper diagonal consistent and settle the thread without pulling the cloth into a ripple. Check each panel against its own key before attaching it to a band. Any cleaning should follow the requirements of the actual threads and fabrics; test those materials together first. Let the panels dry flat and remeasure if they were washed. The guide to simple geometric cross stitch explains why empty spaces and consistent stitch direction matter even in a very small design.
Finish and present the pair as a useful gift
Attach each checked panel to its designated band and cover the reverse with a comfortable lining. Inspect ribbon attachments and folded edges, then test the fit loosely. Do not tighten the ties to compensate for a band that was cut too short. Place the two finished pieces beside each other and compare the intended shared features: cloth color, panel size, palette relationship and finishing style. Minor fit differences are expected when the recipients have different measurements.
Include a short note recording the real thread shades and the care routine suitable for the finished materials. Keep the gift packaging simple enough that it does not hide the motifs. The charts, symbols, counts and previews here have been checked digitally; these examples have not been physically stitch-tested. The square photos are AI-generated editorial illustrations. Use the exact free patterns and symbol PDFs for counting, not a photographic interpretation of the stitches.
Questions about matching bracelet gifts
Must both bracelets use the same motif? No. The heart and star share a grid size, two-color structure and side bars, so one of each can still form a coordinated set. Can I change both colors? Yes, after checking contrast on the real cloth and updating each key. Can I remove the side bars? You can create that variant, but the totals become 40 for the heart and 45 for the star, and you should record the change on your chart.
Where are the downloads? The exact previews and free PDFs follow below. Each contains the original palette, counted grid and legend. For a reversed bracelet, keep the symbols and write the swapped physical colors clearly on your working copy. If you later personalize another motif, preserve a readable chart and recalculate its occupied cells. A thoughtful matching gift depends on clear choices and a comfortable fit, not on making every detail identical or adding as many stitches as possible.
Exact charts and free PDF downloads
Split Heart Friendship Panel
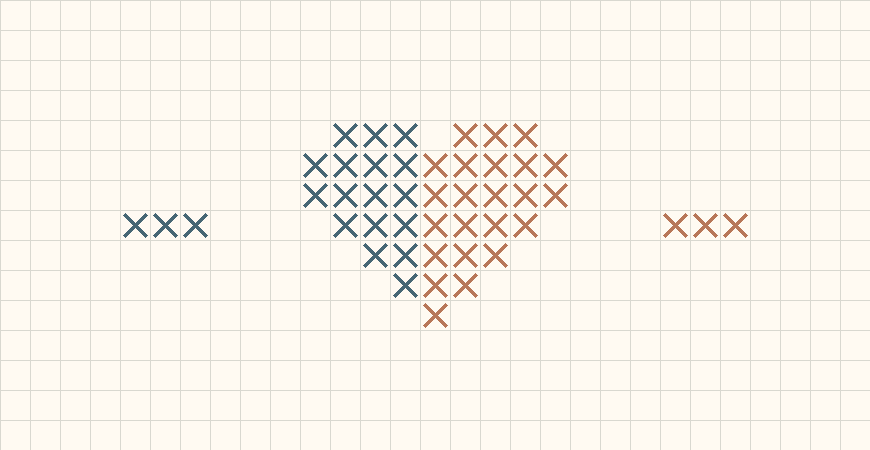
29 × 15 · 46 full crosses
Compass Star Friendship Panel
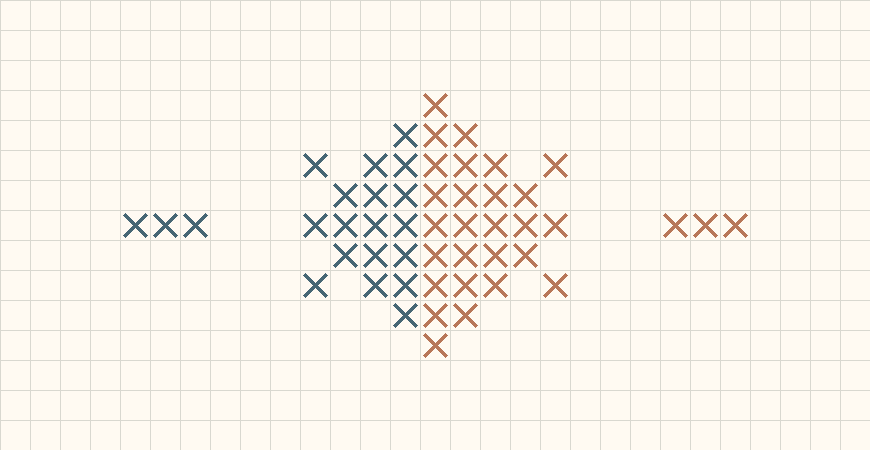
29 × 15 · 51 full crosses
Cross stitch fabric size calculator · Download the original split heart friendship panel pattern
Examples, diagrams and planning estimates are original Cross Stitch Creator content.