
Embroidery floss can become a bracelet in several different ways. You can knot the threads into a friendship bracelet, or use them to stitch a small fabric panel and sew that panel onto a soft band. This guide follows the second method. It includes two original counted designs, Linked Diamonds and Paired Chevrons, with precise color totals, a fitting example and a lined tie-band construction. The full charts and free PDFs are at the bottom. Start with a sample and adjust the band to the wearer; the chart length alone does not determine a comfortable bracelet size.
Choose a stitched panel rather than a knot chart
A cross stitch chart assigns one full cross to each occupied square. An alpha friendship bracelet chart assigns a knot to each square, while an ordinary diagonal knot pattern uses a different structure again. Similar-looking grids do not make the finished sizes or working methods interchangeable. Here, the embroidery sits on Aida and the backing hides its reverse. The ribbon ties are part of the bracelet construction, not extensions of the counted design.
If you prefer a bracelet formed entirely from knotted threads, our friendship bracelet pattern tool makes an alpha color chart. For this fabric version, follow the basic cross stitch guide and the exact symbols supplied below. Choose one of the two panels first. Using both designs on the same short band would require a separate layout and fit check, rather than simply adding their chart widths together.
Prepare threads, fabric and a small trial
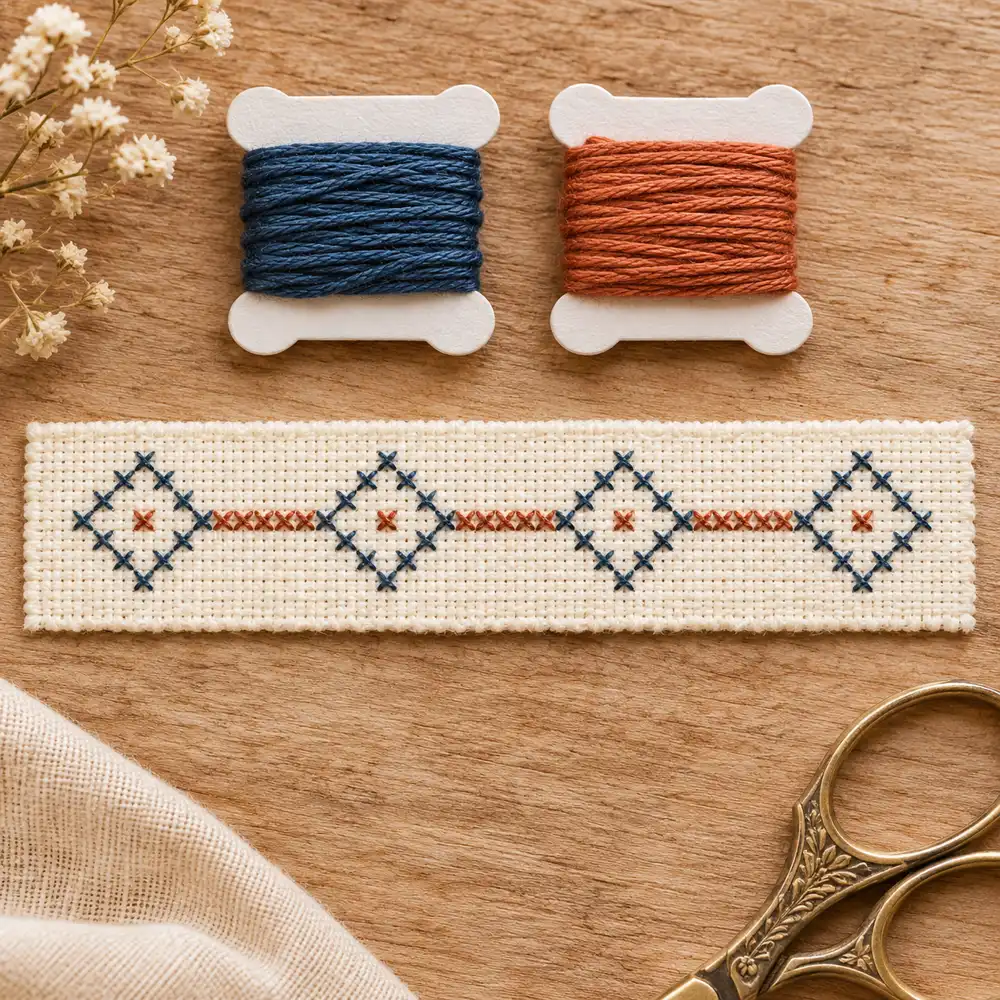
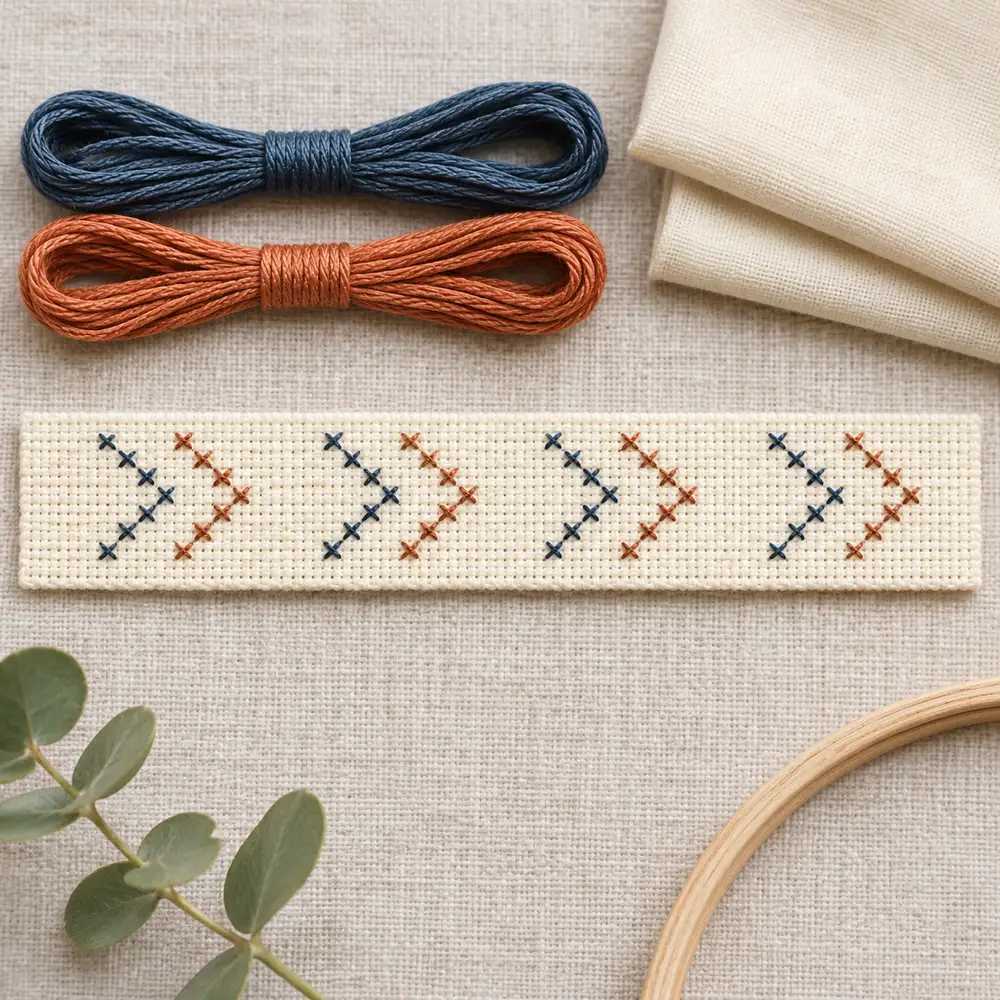
The two designs use the same generic palette: indigo #38546F and terracotta #C16E54 on unstitched cream fabric. These are digital swatch references, not manufacturer floss numbers. Compare actual threads with your cloth in daylight. Use two working strands on 14-count Aida as a starting point and a suitable tapestry needle. You also need cotton fabric for the front and lining, sewing thread, two ribbon ties, scissors and a means of measuring accurately.
Choose soft, washable materials that can tolerate the same care routine. Test the threads and fabric together before making a wearable piece. Stitch a short sample, then fold the proposed backing around it to assess thickness. A dense adhesive or stiff interfacing is not necessary for the construction described here and could change its flexibility. Leave yourself enough Aida around the design to hold it comfortably while stitching; trim to the final panel allowance only after the embroidery is complete and checked.
Calculate the panel size before measuring the band
Both charts are 49 columns wide and 11 rows high. At 14 crosses per inch, the full grid measures 3.50 × 0.79 inches, approximately 8.89 × 2.00 cm. At 16-count it is approximately 7.78 × 1.75 cm, and at 18-count approximately 6.91 × 1.55 cm. Those dimensions describe the decorative panel, including its empty edge cells. They do not describe the circumference of a bracelet or the length of its ties.
Use the fabric size calculator if your fabric count differs. The PDF chart is enlarged for readable symbols, so its printed width is not a cutting template. Draw a separate paper rectangle using the calculated panel dimensions. For a simple turned-under panel, this guide allows an additional 1 cm around each edge: the 14-count cutting rectangle is therefore about 10.89 × 4.00 cm. This allowance is outside the 49 × 11 counted grid, not taken from it.
Fit the fabric band with a paper mock-up
Measure the wrist without pulling the tape tight, then choose a little ease and a gap between the fabric ends for the ties. For example, a 17 cm wrist plus 1 cm ease, minus a 2 cm tie gap, gives a 16 cm finished fabric band. This is an example to test on the wearer, not a universal size. A 4 cm finished band width leaves room above and below the approximately 2 cm-high stitched panel.
Cut a paper strip to the proposed finished band dimensions and wrap it loosely around the wrist. Bend the hand and check whether the edges interfere with movement. Adjust the length, width or gap before cutting fabric. With 1 cm seam allowances on every side, a 16 × 4 cm band needs two cotton rectangles of 18 × 6 cm. Keep those sewing allowances separate from the embroidery panel allowance; they serve different parts of the construction.
Stitch the Linked Diamond panel
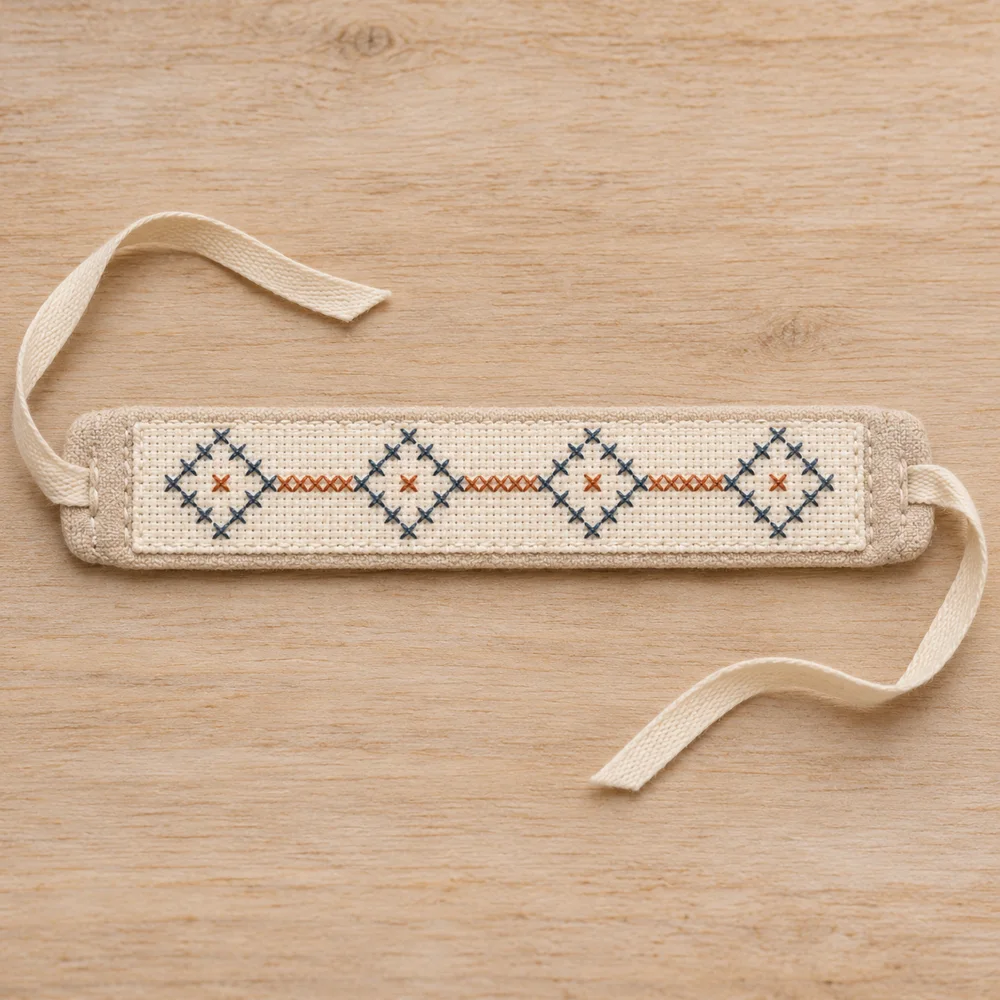
The Linked Diamond chart contains 67 full crosses: 48 indigo and 19 terracotta. Four hollow diamonds each have a 12-cross indigo outline and one terracotta center. Their centers are at columns 7, 19, 31 and 43 on row 6, counting from the top-left corner with coordinates starting at 1. Each outline reaches three columns and three rows away from its center. Five terracotta crosses connect each neighboring pair along the center row.
Stitch one diamond, check its outline and empty interior, then continue across the panel. An extra stitch inside a hollow diamond changes the intended open appearance. The three connecting runs contribute 15 terracotta crosses, and the four centers supply the remaining four. Keep the Linked Diamond pattern page nearby for the exact preview. Blank cells stay unstitched; the cream background is the fabric itself, not an additional floss color. Check the full row of centers before securing the final thread tail.
Stitch the Paired Chevron panel
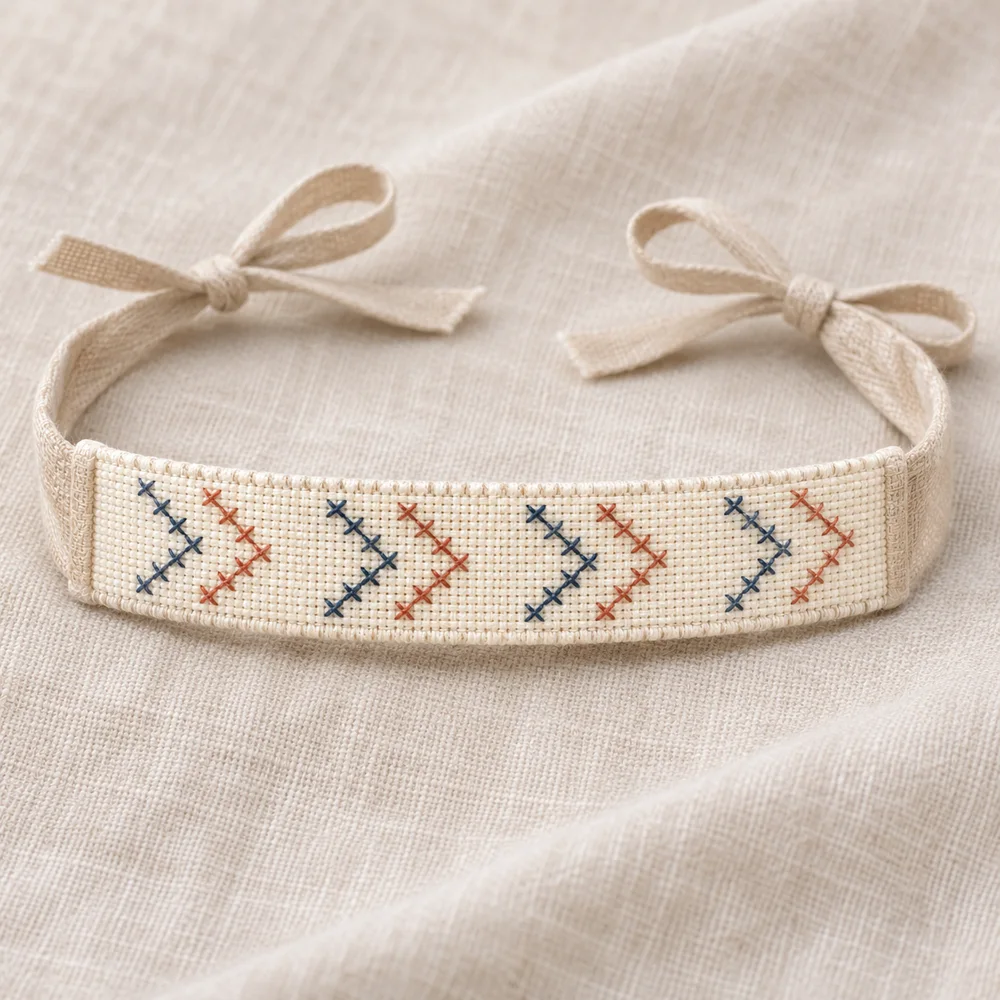
The Paired Chevron chart contains 56 crosses, split evenly between 28 indigo and 28 terracotta. Each repeat consists of two right-pointing open chevrons, with seven crosses in each chevron. There are four repeats. In the first pair, the indigo chevron begins at column 5, row 3, reaches its point at column 8, row 6 and returns to column 5, row 9. The terracotta partner is four columns farther right.
The next pair starts 12 columns after the first. Keep the empty gaps intact rather than joining the chevrons into a solid zigzag. The Paired Chevron pattern page shows the exact stepped placement. Work the top diagonals consistently in both colors so the thread surface catches the light evenly. If you mirror the design, all arrows point the other way but the totals remain unchanged. Do not confuse mirroring with swapping the two colors; those are separate choices.
Plan repeats without guessing the new stitch count
Both supplied panels use four repeats, but you can redraw them for a longer decorative area. Preserve the original 12-column distance between repeat starts. With the same outer margins, adding one repeat increases the chart width from 49 to 61 columns. At 14-count, 61 columns measure approximately 11.07 cm. Test that wider paper panel on your band before investing time in the extra stitches.
A fifth linked diamond adds 12 indigo outline crosses, one terracotta center and five terracotta connecting crosses. The extended version therefore has 85 crosses: 60 indigo and 25 terracotta. A fifth chevron pair instead adds 14 crosses, producing 70 in total, 35 of each color. These are calculated adaptations, not extra PDF downloads included here. Record a modified layout in the blank-grid tool, then check every added cell. Extending the embroidery does not automatically mean the wristband should become longer.
Keep the reverse tidy before covering it
A lining hides the reverse, but it should not conceal problems that make the band uncomfortable. Secure starts and finishes under nearby stitches and avoid hard lumps. Long thread carries across open areas can show through pale Aida or catch while you handle the unfinished panel. End the thread and restart when the gap is too large to cross neatly. Inspect the reverse after each repeat, while corrections are still easy.
Pull each cross just enough to settle the thread on the cloth. If the fabric narrows or ripples, reduce tension rather than trying to stretch it back during assembly. Finish any cleaning allowed by the material care instructions before measuring the final panel. Let it dry flat and check the dimensions again. The chart totals have been verified digitally, but that does not establish how a particular combination of thread, cloth and washing method will behave in use.
Attach the panel to the band front
After checking the embroidery, mark the full-grid rectangle on the cloth and leave the extra 1 cm allowance beyond each side before trimming. Turn those allowances under carefully. At the corners, distribute the folds so they do not form a thick lump; avoid cutting close to the counted area. The folded panel should retain its planned dimensions, with the blank edge cells still visible around the stitches.
Center the panel on the right side of one cotton band rectangle, within the future seam lines. For the 16 cm finished example, an 8.89 cm panel leaves approximately 3.56 cm of plain band at each end when centered. Baste it in place and sew its folded edge down with small, even stitches. Keep the cotton backing relaxed, and check that the panel lies flat before proceeding. The small garment-motif guide offers another example of separating stitch placement from sewing margins.
Add the lining and ribbon ties
For the fitting example, prepare two ribbon pieces about 19 cm long, reserving 1 cm of each for the seam and leaving about 18 cm outside. Adjust their usable length after a trial knot or bow, and finish fraying ribbon ends appropriately. Place one ribbon at the center of each short edge of the band front, with the free lengths lying inward over the right side. Baste them so their attachment points will be caught in the end seams.
Place the lining on top, right sides together. Keep the loose ribbon lengths away from the seam path. Sew with the planned 1 cm allowance, leaving an opening along a long edge for turning. Reinforce the ribbon attachment seams, trim bulky corners without cutting the stitching, and turn the band right side out. Close the opening neatly, then inspect both tie attachments. Test the fit loosely and adjust the ties; the bracelet should not depend on stretching the embroidered panel to close.
Check wearability and plan care
Wrap the finished band around the wrist and check the gap, the placement of the panel and the comfort of the edges. The decorative rectangle should sit on the visible upper area, while the ties meet where the wearer can manage them. If the band feels too stiff, reconsider the backing layers rather than pulling the ties tighter. If it twists, check whether the lining was sewn with uneven tension or the panel was attached off-center.
The charts, symbols, color totals and exact previews supplied here have been checked digitally. These bracelet examples have not been physically stitch-tested. The square photographs are AI-generated editorial illustrations, so use the exact free patterns and symbol PDFs as your counting references. Keep a note of the actual floss, fabric count, finished band length and care method. Remove the bracelet before activities that soak or heavily abrade it, and inspect the sewn ties periodically rather than assuming every material combination wears identically.
Questions about embroidered fabric bracelets
Can I use an alpha knot chart as a cross stitch chart? Its color layout can suggest an arrangement, but one knot and one cross have different dimensions and construction. Recalculate size and work from a clear counted grid. Can I use fewer strands? Yes, after a sample confirms the coverage you want; the number of occupied cells stays the same. Can I make the bracelet without a lining? You can choose another finishing method, but this tutorial's lining covers the reverse and provides a soft backing.
Where are the free charts? The exact previews and landscape PDFs follow below. Each contains a color-and-symbol grid and a legend. Print large enough to read comfortably and retain the written counts when changing print scale. If your wrist size differs from the example, adjust the fabric band and ties first, then decide whether the decorative panel needs a different count or repeat length. A comfortable fit matters more than filling every centimeter with stitches.
Exact charts and free PDF downloads
Linked Diamond Bracelet Panel
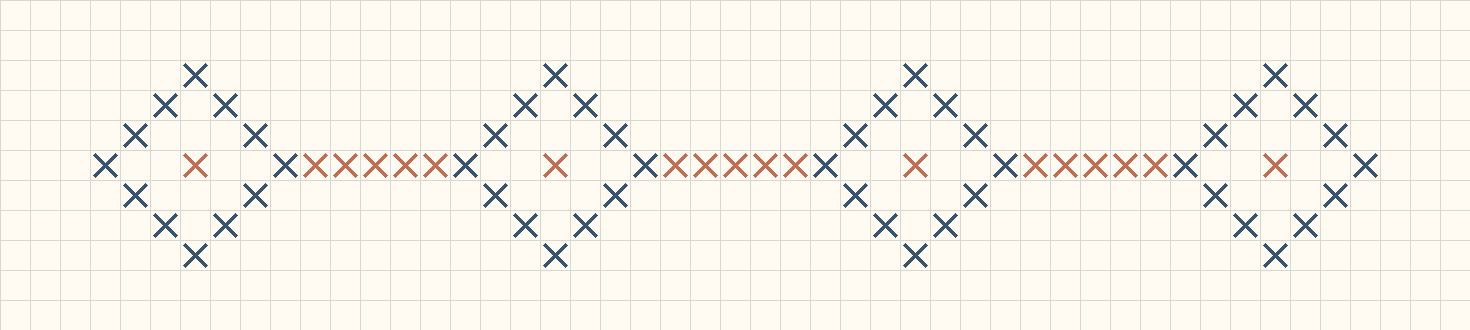
49 × 11 · 67 full crosses
Paired Chevron Bracelet Panel
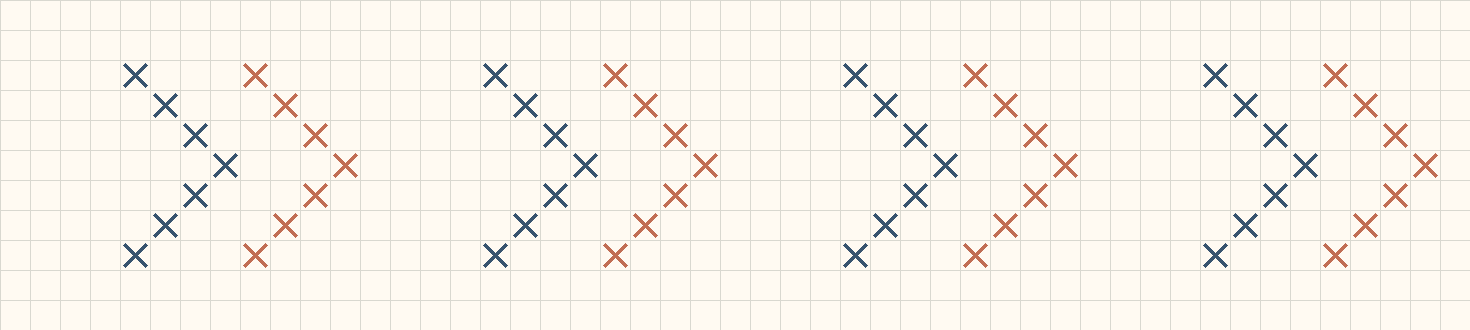
49 × 11 · 56 full crosses
Cross stitch fabric size calculator · Download the original linked diamond bracelet pattern
Examples, diagrams and planning estimates are original Cross Stitch Creator content.