
A small embroidered detail can give a plain blouse a personal finish without covering the whole garment. The difficult part is often deciding where the stitches belong: a cuff folds, a collar turns, and a seam can hide a flower that looked perfectly placed on a flat table. This guide provides two original counted designs and a measured way to position them. Start with the Three Bud Cuff Band or the Twin Blossom Collar motif, make a sample, and use the free symbol charts at the end of the article. These are hand cross stitch patterns, not embroidery-machine files.
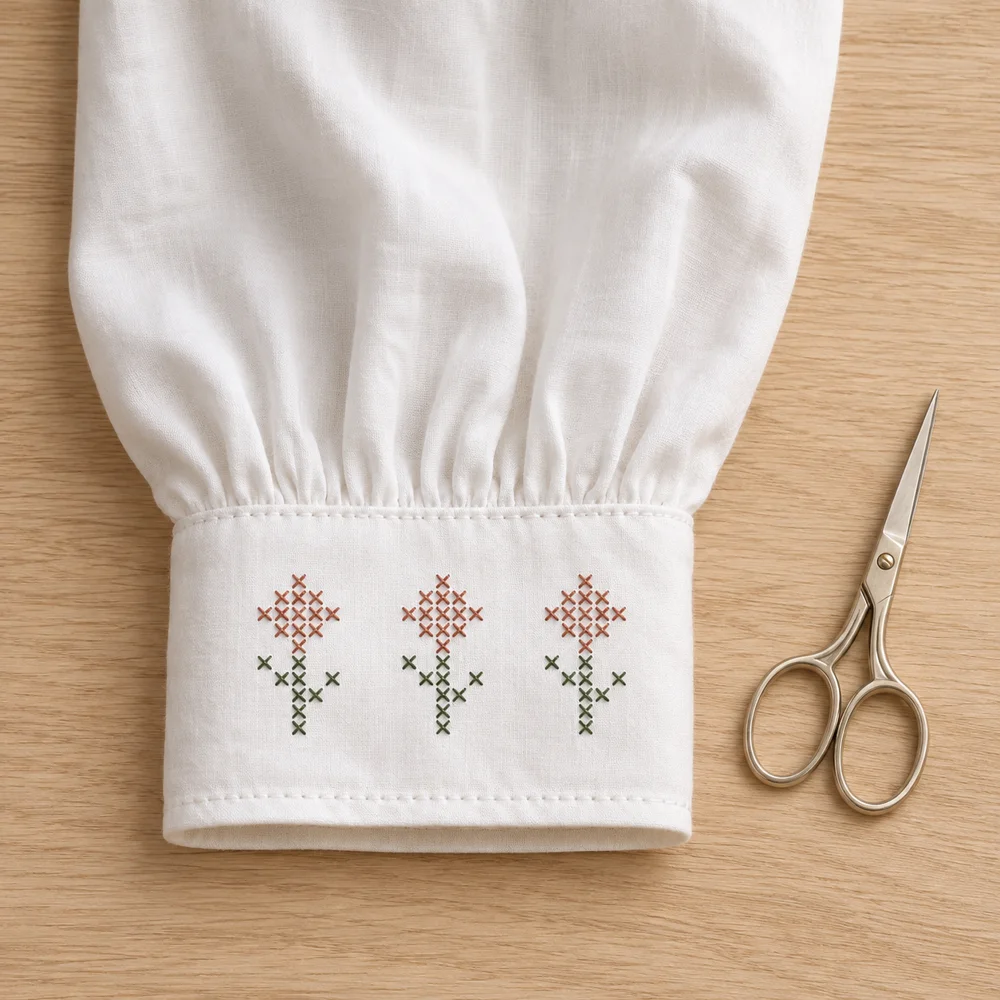
Choose a blouse that suits counted embroidery
For a first attempt, choose a stable woven blouse with an accessible cuff or collar rather than a stretchy knit or a delicate sheer fabric. Hold the proposed area up to the light. If the weave shifts when gently handled, a grid alone will not make the fabric behave like Aida. An existing interfacing layer can also change how easily a needle passes through a collar. Try the full combination of garment, temporary grid and thread on a comparable offcut before working on the visible part.
Inspect both sides of the garment. Can you reach the back of the chosen area without catching the sleeve or joining two layers unintentionally? If not, select another position or make a separate stitched patch. The beginner cross stitch guide explains the basic crosses; here the main task is adapting their placement to a garment that must still fold and move comfortably.
Gather materials and make a useful sample
You need the chosen chart, two embroidery floss colors, scissors, a suitable needle, and a counted surface. Practice on 14-count Aida with two working strands. For a plain woven blouse, use a removable counting canvas compatible with the fabric and follow its own removal instructions. A needle suitable for Aida may not pass cleanly through tightly woven clothing, so select a point and thickness that enter the garment without forcing or enlarging its weave.
The palette uses generic green #426652 and terracotta #B66255. These are digital color references, not guaranteed matches to a particular floss brand. Place your real threads against the blouse in daylight and check whether the flowers remain distinct. Make the sample with the same working strands and the same temporary canvas intended for the garment. Wash or remove the canvas only as allowed by both product instructions and the blouse care label; a successful Aida sample does not prove a blouse can tolerate soaking.
Measure the chart and the actual stitched footprint
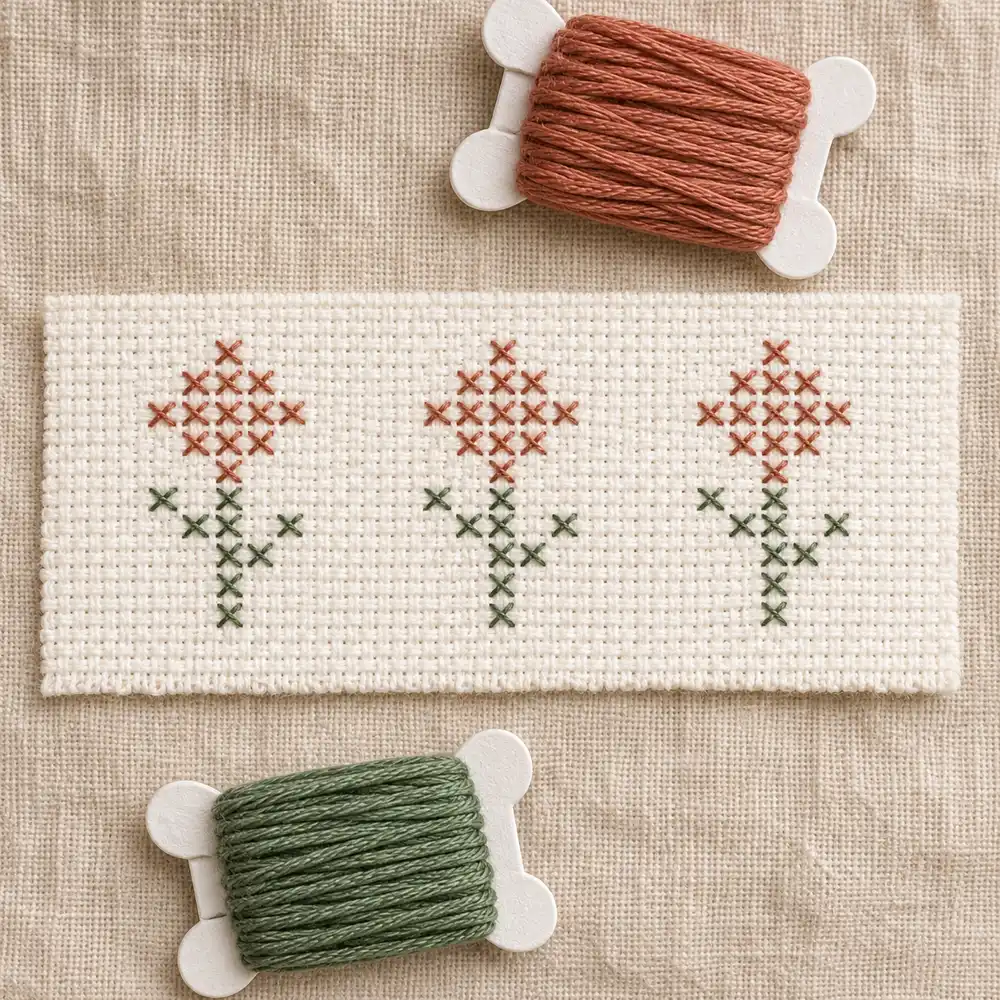
The cuff chart contains 35 columns and 17 rows. At 14 crosses per inch its entire grid measures 2.50 × 1.21 inches, or approximately 6.35 × 3.08 cm. Its occupied footprint is smaller: 27 columns by 10 rows, approximately 4.90 × 1.81 cm. The collar chart is 21 × 21 cells, a full-grid size of 1.50 inches or 3.81 cm square. Its occupied footprint is 14 × 14 cells, approximately 2.54 cm square.
These two measurements serve different purposes. Preserve the chart boundary when locating numbered cells; use the occupied footprint to judge what people will actually see. Use the fabric size calculator for another count. The printable chart is enlarged for reading, so do not use the physical size of its printed squares as a garment template. Draw separate paper rectangles using the calculated dimensions and mark their top edges.
Position the motifs while wearing the blouse
Button the blouse and fold the cuffs and collar as you normally wear them. Temporarily hold a paper template in the proposed position, then check it in a mirror with the arm relaxed and bent. A design placed in the visual center of an open cuff may disappear beneath the overlap when fastened. Mark the visible area and keep embroidery clear of buttonholes, seam allowances, stiff folds and places that rub against jewelry.
There is no universal distance from a collar point that fits every blouse. Measure from the seam line rather than an irregular raw edge, and record the distance to the closest occupied stitch. On paired sides, use matching seam landmarks. Photograph the paper arrangement for your own reference before removing it. If the placement looks cramped, use one motif or a finer compatible counting grid rather than squeezing the stitches together. Changing count changes physical size; changing thread tension should not.
Stitch the Three Bud Cuff Band
This pattern has 66 full crosses: 27 green and 39 terracotta. The three flowerheads are identical diamonds of 13 crosses each. Read coordinates from the top-left corner of the chart, starting with column 1 and row 1. Their center columns are 7, 18 and 29; their center row is 6. Each flower occupies five rows with 1, 3, 5, 3 and 1 terracotta crosses, centered on its own column.
Each green stem runs from row 9 through row 13. Four additional green crosses form the small leaves around that stem. Follow the exact preview for their stepped positions rather than drawing a continuous diagonal line between them. Stitch one complete bud and compare it with the chart before beginning the next. The free cuff-band pattern page provides a separate reference. Blank cells are part of the spacing and stay unstitched; they are not white floss instructions.
Stitch and mirror the Twin Blossom Collar motif
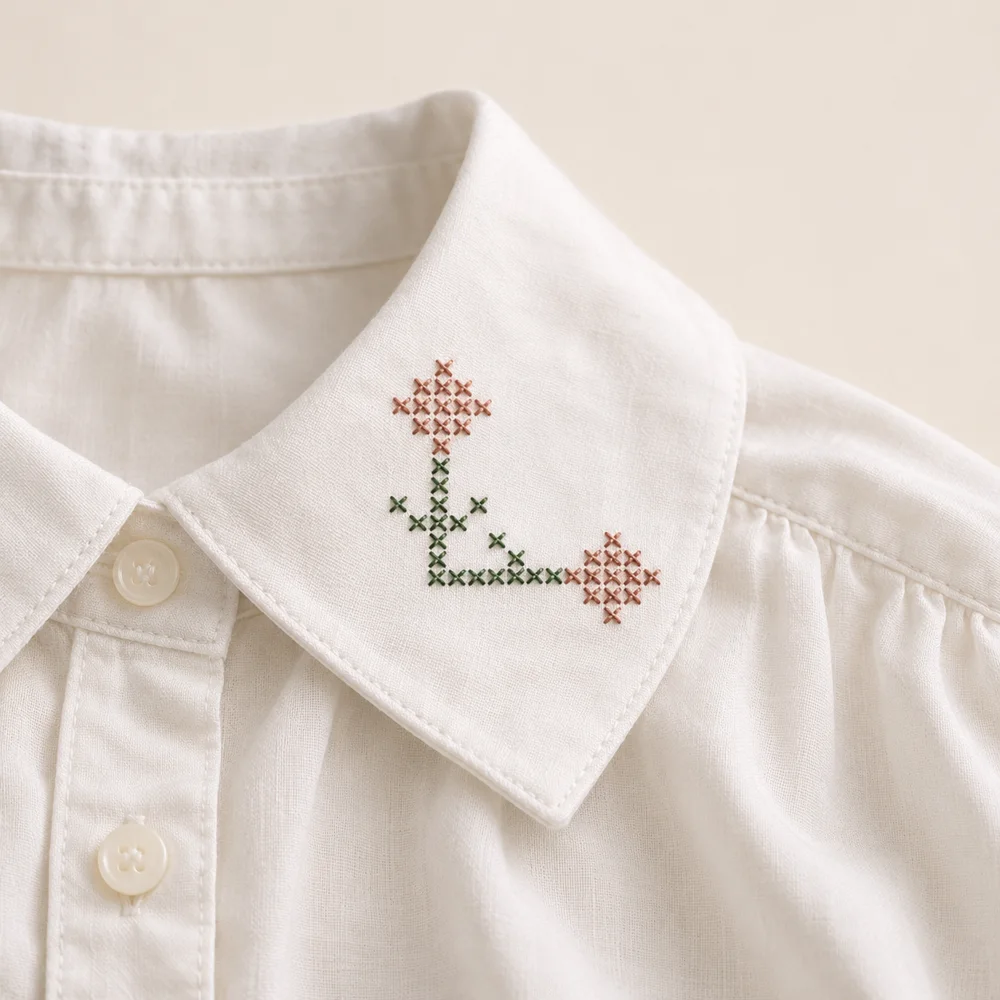
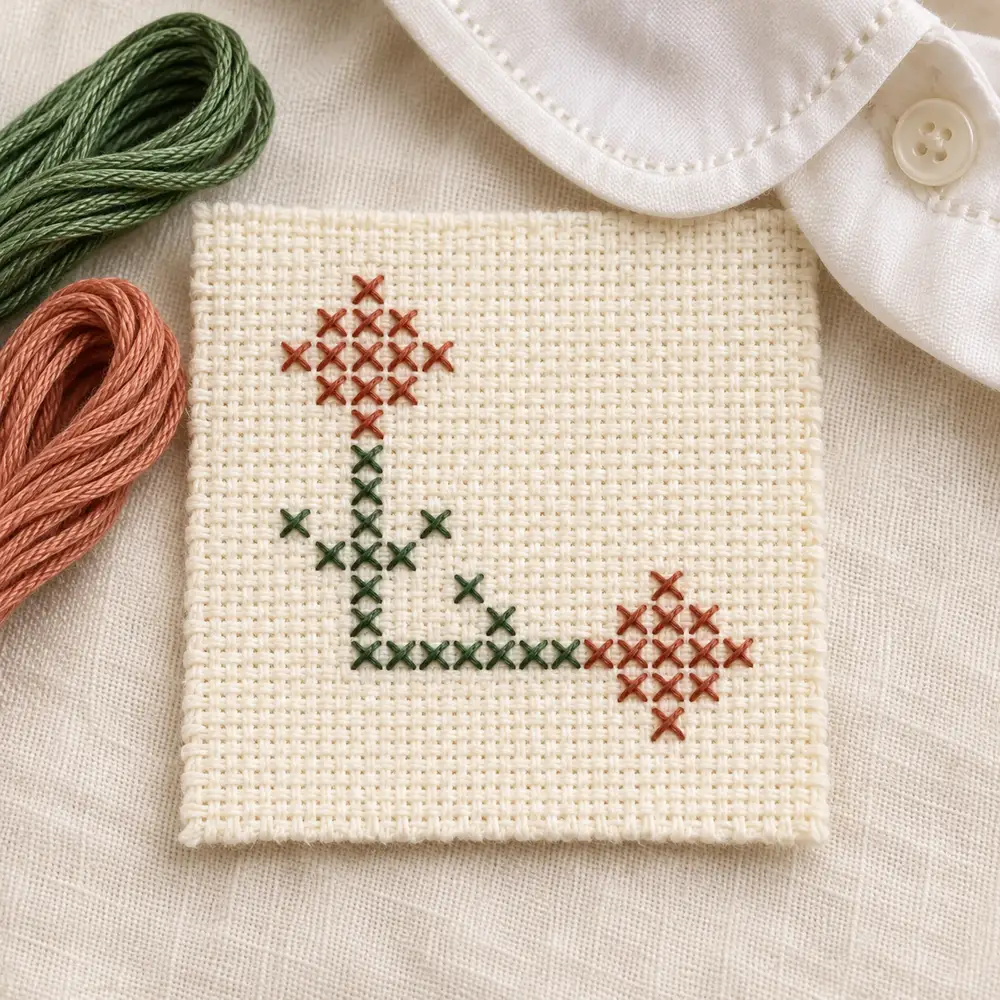
The collar motif has 45 full crosses: 19 green and 26 terracotta. Two diamond flowerheads each contain 13 crosses. Their center coordinates are column 7, row 7 and column 16, row 16. A green stem descends from the first flower and turns across the lower part of the design toward the second. Small stepped leaves sit beside that angular stem. There are no fractional stitches, backstitch lines or beads in this chart.
For a matching collar pair, decide whether you want identical orientations or a mirrored pair before stitching. A horizontal mirror of the 21-column grid maps any original column c to column 22 minus c; row numbers stay unchanged. For example, column 7 becomes column 15. Both versions still contain 45 crosses. Mark the mirrored paper template clearly, because rotating a chart is a different operation. Keep the collar pattern page open beside your sample when checking the original orientation.
Transfer the placement without distorting the fabric
A counted motif needs a consistent square grid. Tracing only its outer silhouette onto plain cloth does not supply the individual stitch positions. Baste the temporary counting canvas in the chosen position, aligning its rows with the intended garment direction. Check the template again after basting; the collar fold and the grid baseline should agree. Keep the fabric relaxed and flat rather than pulling it until every crease disappears.
Use a small hoop only if it fits the area without crushing a thick seam or stretching the garment. Some narrow cuffs are easier to support in the hand. Test the method before committing to the blouse. Our removable-canvas guide covers the counting-surface options in more detail. Do not replace the temporary grid with an improvised printer transfer unless you have independently established how the product behaves on that particular fabric.
Keep the reverse comfortable and secure
A collar or cuff may touch the skin, so the back deserves attention. Begin with a secure method that suits your thread arrangement, and finish by weaving the tail under several nearby stitches. Avoid leaving a hard knot exactly where the collar turns. Keep thread paths short across blank cloth: a long dark carry can show through a pale blouse and may catch during wear. End the thread and restart when a gap is too wide to cross neatly.
Work the upper diagonal of each cross in the same direction. Pull only until the thread rests against the fabric; a small decorative motif does not need to cinch the underlying weave. If the fabric puckers while still on the temporary grid, pause and check tension instead of expecting washing to remove every distortion. Examine the reverse after each flower, while a misplaced carry or caught garment layer is still easy to correct.
Repeat the cuff design without losing the spacing
The three bud centers are 11 columns apart. That measured spacing is useful if your visible cuff area needs a longer row. To continue the same rhythm, the next center after column 29 would be column 40 on an extended grid. Do not simply butt two 35-column chart rectangles together: the blank margins would change the gap between their nearest flowers. Draw the extended layout before stitching and keep track of the new total width.
Each complete bud adds 22 crosses, comprising 9 green and 13 terracotta. Four identical buds therefore contain 88 crosses. This is a calculated extension, not a separate downloadable chart in this article. The blank-grid tool can help you record your own layout. Check the garment again after extending it: a mathematically even repeat may still disappear into the cuff overlap, and the first and last flowers should both remain in the usable area.
Remove the temporary canvas and finish carefully
Remove the counting canvas according to the specific product instructions, not by assuming every canvas dissolves. Support the stitched area while working and keep the garment layers separated. If the chosen product requires water, first establish that the blouse, interfacing and floss can all tolerate that treatment. Work on the sample before the finished garment. Check for remaining fibers or residue around the stems and the centers of the flowerheads.
Let the area dry in a shape that does not pull the collar or twist the cuff. Press only if the care label allows it, protecting the stitches with a soft surface and avoiding flattening their texture unnecessarily. Try on the blouse again and move the arm. A neat result should remain comfortable at the fold. If you prefer a removable decoration, finish a separate stitched panel and attach it with an appropriate hand-sewn edge, allowing for its extra thickness.
Check the result before calling the project finished
Compare each flower with the exact counted preview, then count the occupied stitches by color if you have changed the design. The original cuff band must total 66; the original collar motif must total 45. Those totals help find omissions, but they cannot prove that every cross is in the correct cell. Also compare the positions of the leaves, the empty gaps and the two collar flower centers. Inspect the reverse for unsecured ends or accidental catches through another layer.
The charts, color keys, counts and previews supplied here have been checked digitally. We have not physically stitch-tested these garment samples. The square photographs are AI-generated editorial illustrations and are not the authoritative counting reference. Use the exact free patterns and the PDFs below when working. Keep a note of your actual thread choices, grid count and placement measurements so that a second cuff can match the first without relying on memory.
Questions about blouse cross stitch
Can these charts run on an embroidery machine? No. They describe full hand-worked crosses on a counted grid; a machine requires a suitable digitized file and its own material and stabilizer setup. Can I stitch directly into the blouse? Only when you can establish an appropriate counting surface and a method that suits the garment. Plain woven cloth does not automatically provide evenly spaced cross stitch holes.
Must both collar sides match? No; one motif can be an intentional accent. If you want symmetry, measure and mirror the placement before stitching. Can I change the colors? Yes, retaining the symbol-to-color mapping and checking contrast with the blouse. Where are the downloads? The exact previews and free PDFs are immediately below this guide. Choose the cuff band or collar motif, print the chart large enough to read comfortably, and use the written measurements rather than print scale when positioning it on clothing.
Exact charts and free PDF downloads
Three Bud Cuff Band
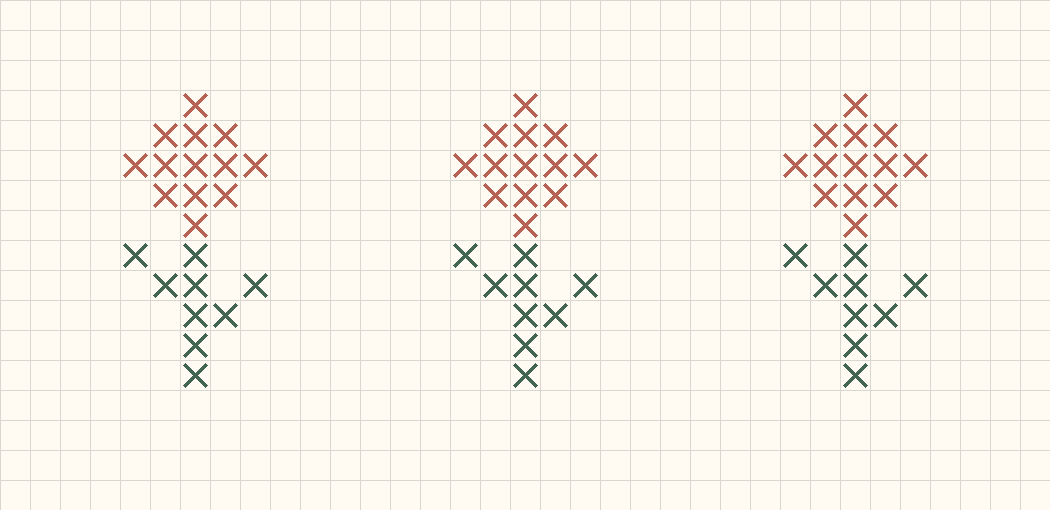
35 × 17 · 66 full crosses
Twin Blossom Collar
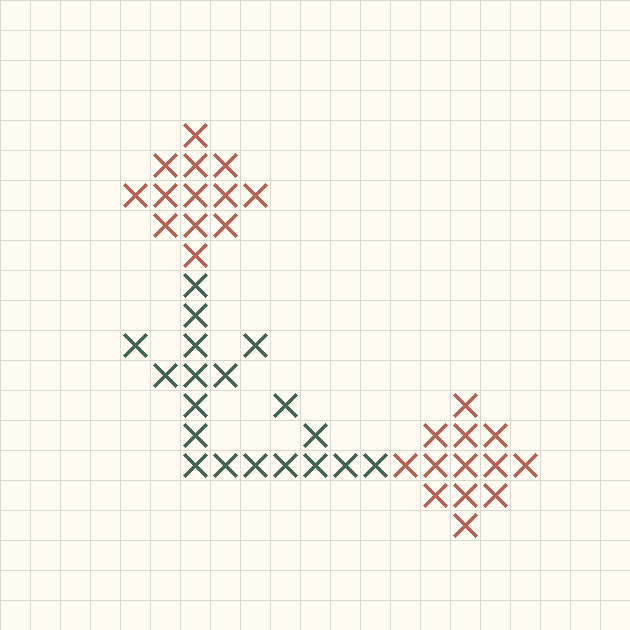
21 × 21 · 45 full crosses
Cross stitch fabric size calculator · Download the original three bud cuff band pattern
Examples, diagrams and planning estimates are original Cross Stitch Creator content.